Surprise Your Viewers with a Flash Effect for Premiere Pro

Are you ready to take your promotional videos to the next level? In this tutorial we will show you how to use the Flash Impacts video transition in Adobe Premiere Pro.
This is a powerful tool that will add energy to your video and captivate your viewers' attention in a flash, see what I did there? By incorporating this dynamic effect into your videos, you'll enhance their visual appeal and create a memorable viewing experience that leaves a lasting impression.
We highly recommend you also watch the video above for a more in-depth visual tutorial. So, are you ready? Let’s dive in!
Applying and Customizing Flash Impacts
Below we’ll outline some of the basic steps you should take to achieve the perfect Flash effect for your transition. Make sure not to miss a step as they are all equally valuable in the process of perfection.
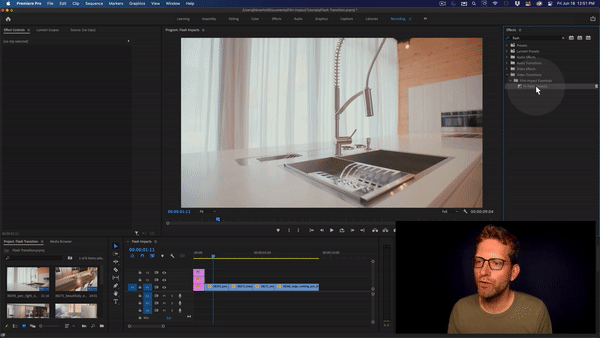
To begin, navigate to the Effects Library and locate Flash Impacts under Film Impact Essentials. Applying the transition is as simple as a drag and drop action onto your footage. Once applied, you'll witness a vibrant and impactful flash effect that instantly grabs the viewer's eyes.
Adjusting the Parameters
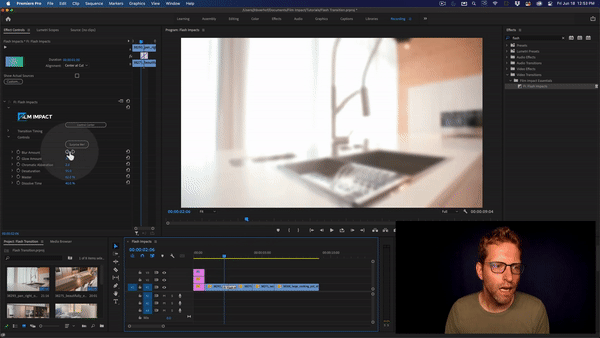
Now that you have Flash Impacts applied, it's time to unleash your creativity and customize it to suit your video's style and mood. Head over to the Effects Controls tab to explore the various parameters at your disposal.
To observe the changes in real-time, place the playhead around the center of the transition. This way, you can fine-tune the effect while seeing the results instantaneously.
Managing Saturation and Colors
One characteristic of Flash Impacts is its tendency to enhance the saturation of colors in your footage. However, you have full control over the intensity of the colors.
By adjusting the desaturation slider, you can bring down the color saturation to achieve a more balanced visual effect. This allows you to maintain the vibrant flash while ensuring the colors blend harmoniously with the overall composition.
Experimenting with Blur and Glow
To add a touch of dreaminess and evoke a sense of ethereal beauty in your transition, Flash Impacts provides you with the versatile Blur Amount parameter. This parameter allows you to precisely control the level of blurring applied to your footage.
By delicately adjusting the Blur Amount, you can create a soft and subtle blur that adds a captivating atmosphere to your video. However, it's essential to exercise caution and avoid going overboard with the blurring effect.
While a well-executed blur can enhance the visual aesthetics, excessive blurring can become a distraction and detract from the overall impact of your video. Striking the perfect balance is the key.
Adjusting Chromatic Aberration
For a modern and captivating look, consider adding chromatic aberration to your transition. This effect introduces vibrant red, green, and bluish colors to the edges of your footage, creating a unique visual impact.
Experiment with the Chromatic Aberration slider to find the desired level of intensity that complements your video's style and narrative. It's an excellent way to add a contemporary touch and make your videos stand out.
Fine-tuning Dissolve Time
The Dissolve Time parameter is another essential aspect of Flash Impacts. It controls the duration of the transition, allowing you to create a seamless dissolve effect. By lowering the Dissolve Time to zero, you can achieve an instant cut at the center of the transition.
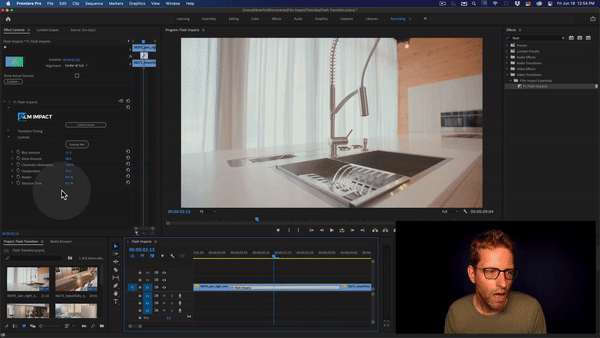
On the other hand, setting it to 100 will utilize the entire length of the transition for the dissolve effect. Find a balance by adjusting the Dissolve Time parameter based on your preference and the rhythm of your video.
This way, you can create a smooth and visually captivating transition that seamlessly guides your viewers through the story.
Playing with Transition Timing
To add an extra layer of excitement and energy to your video, you can play with the timing of Flash Impacts. Double-click on the transition to reveal the Transition Duration parameter, which is initially set to one second.
Adjust this value by adding or subtracting the number of frames, allowing you to speed up or slow down the transition. Analyze the rhythm of your video and consider aligning the timing with the music or the beat of the action to create a more dynamic and engaging effect.
Experiment with different frame values until you achieve the desired impact, amplifying the visual experience for your viewers. But don’t worry, the process of fine-tuning Flash Impacts takes only a minute or two.
Applying the Flash Effect to Multiple Clips
Once you've meticulously fine-tuned Flash Impacts on a specific cut in your sequence, you'll be thrilled to discover that applying the same effect to other clips is an absolute breeze. This convenient process allows you to maintain consistency and amplify the visual impact of the flash effect across your entire promotional video.
To replicate Flash Impacts onto other clips, simply follow these straightforward steps. First, select the transition you've perfected by clicking on it in the timeline. Next, press Command + C (or Control + C for Windows users) to copy the transition to your clipboard.
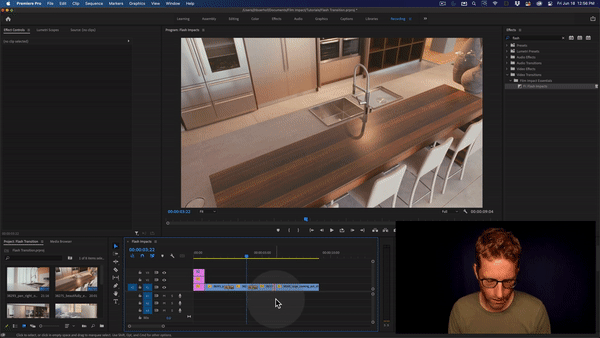
With the transition copied, navigate to the desired clip in your timeline where you want to apply the flash effect. Click on the clip to make it active and then press Command + V (or Control + V for Windows users) to paste the transition onto the new clip.
Voila! The powerful and attention-grabbing flash effect seamlessly spreads its magic onto the additional clip. Keep in mind that this process can be also used for other transitions as well, so make sure to learn it well!
Congratulations!
You've learned how to surprise and engage your viewers with the Flash Impacts video transition in Adobe Premiere Pro. By manipulating parameters such as saturation, blur, chromatic aberration, dissolve time, and transition timing, you can create an energetic and captivating effect.
Experiment with different settings to find the perfect balance for your promotional videos. Stay tuned for more exciting tutorials. Until next time!