How To Quickly Apply Video Transitions To A Whole Bunch Of Clips

Selecting and Applying Transitions
When working with complex sequences containing numerous video tracks, it can be challenging to navigate and apply transitions efficiently.
Jaap demonstrates a simple yet powerful technique to select all the cuts in one fell swoop. First, click the tilde key (~) to temporarily open the sequence and get a bigger view of your clips. Then by holding down the Command key (Control key for Windows), you can click and drag to select all the cuts simultaneously.
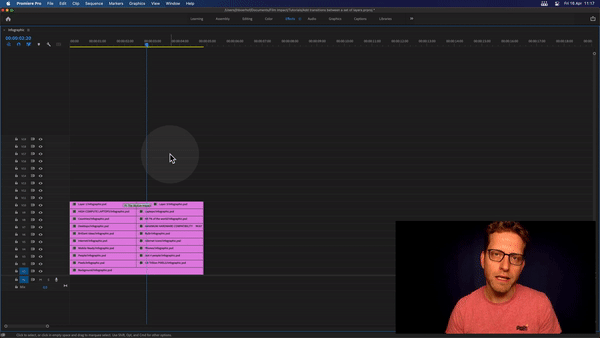
Click here to watch the full video
It's a game-changer for saving time! Once the cuts are selected, applying the default video transition is a breeze. Just press Command + D (Control + D for Windows), and watch as the transitions magically appear. Who doesn’t love shortcuts, right?
“But what if I don’t want to use this exact video transition?”. No problem! Setting a new default video transition is a breeze! Let me show you how it’s done.
Setting a Default Video Transition
Premiere offers a valuable feature that allows you to set a default video transition. This option saves you from the hassle of repeatedly navigating through the effects browser for each clip. Jaap recommends using the Dissolve Impacts transition as the default choice.
This particular transition provides smoother results compared to alternatives like Build and Cross Dissolve. Setting Dissolve Impacts as the default is incredibly simple. Right-click on the transition in the effects browser and select "Set selected transition as default."
Now, each time you apply transitions to multiple clips, Premiere will automatically use the default transition. It's a small adjustment that yields significant time savings.
“But what if I don’t want to set up a new default transition every single time?” - Yes, you’ve got a point here. Setting a new default transition every time isn’t the only way to apply a transition to multiple clips at once. Let me show an even better way to achieve that!
Applying Different Transitions to Multiple Clips
While the default transition can be a great timesaver, sometimes you want to add a creative touch to your edits. Jaap demonstrates how to apply a different transition to all the clips at once, allowing for consistent and dynamic effects.
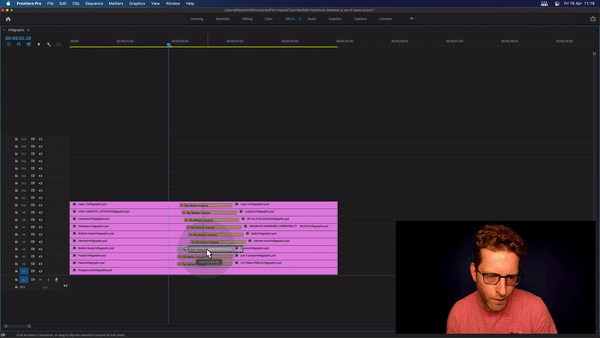
As an example, let's consider the Flip Motion Impacts transition. To apply it to multiple clips simultaneously, first click again the tilde key (~) to open up again the sequence and then drag and drop Flip Motion Impacts to the very first video track you have.
Then press Command + C (Control + C for Windows) to copy the transition. Next, select all the cuts by holding down the Command key (Control key for Windows) and press Command + V (Control + V for Windows) to paste the transition onto each clip.
Just like that, your entire sequence is adorned with the Flip Motion transition, instantly adding a playful and dynamic effect. Good luck doing that manually if you have clips on 50 timelines, right?
That’s basically it for applying a transition to multiple clips, but hey, here is a little trick to make your edits look fascinating!
Exploring Dynamic Timing
To take your edits to the next level, Jaap introduces the concept of dynamic timing. This technique involves adjusting the timing of each transition slightly to create a visually engaging flow between clips.
By incorporating subtle variations in timing, you can create a captivating stair-like pattern that keeps your audience enthralled.
Experiment with different timing variations to find the perfect balance that suits your edit. Dynamic timing adds that extra touch of creativity and ensures a seamless visual experience.
Conclusion
Congratulations! You've learned a valuable time-saving technique for applying video transitions to multiple clips at once in Adobe Premiere. By selecting and applying default transitions or copying and pasting specific transitions, you can effortlessly enhance the visual appeal of your edits.
Don't forget to explore dynamic timing, as it adds that extra touch of creativity and captivates your audience's attention. Remember to subscribe to our channel for more insightful tutorials that will help you elevate your editing skills.
With this newfound knowledge, you'll be able to expedite your editing process while still producing stunning videos. Happy editing!